Step-by-Step Guide to Embroidery for Beginners
Embroidery is more than just stitching—it’s a chance to slow down and express yourself creatively. Wondering what is embroidery? It’s the art of decorating fabric with needle and thread. With the global embroidery market expected to double by 2032, there’s never been a better time to pick up this relaxing craft. 🧵
Key Takeaways
Embroidery is a fun and relaxing hobby to show creativity. It helps you focus and improves hand skills while being enjoyable.
Begin with simple tools like a hoop, needles, and thread. These basic items make your first project simple and fun.
Try easy stitches like backstitch and French knot on old fabric. Learning these stitches gives confidence and prepares you for harder designs.
What is Embroidery and Why Start?
Understanding the Basics of Embroidery
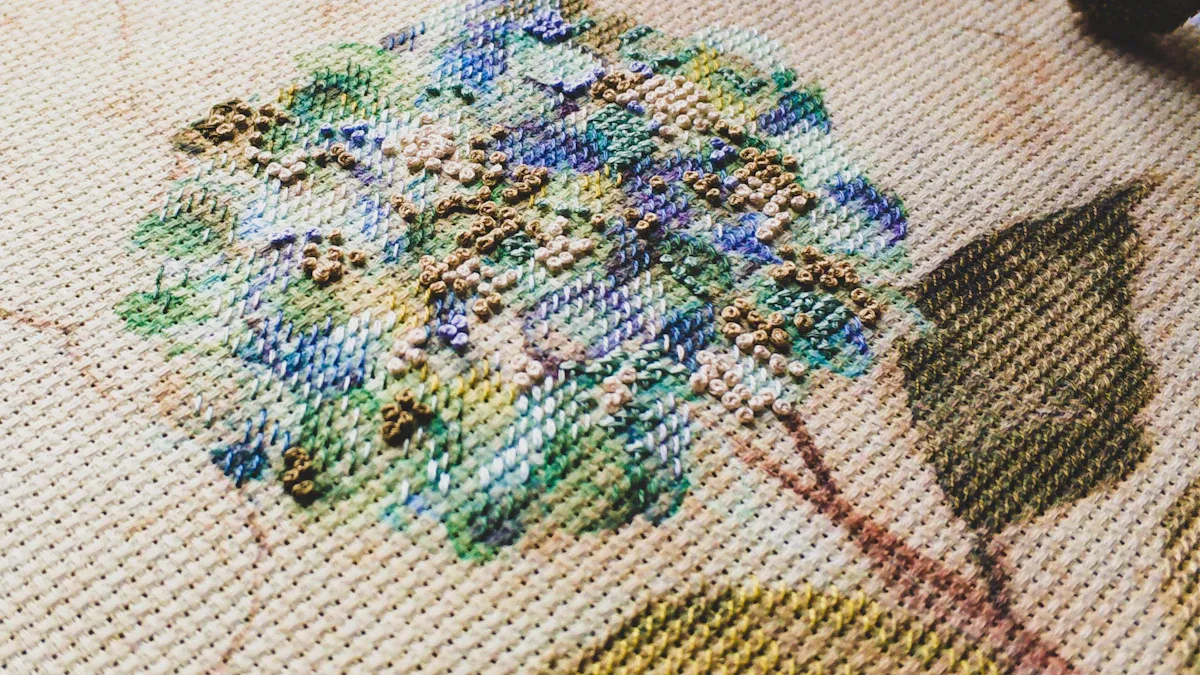
Embroidery is a craft that has been around for ages. It mixes old traditions with creative ideas. At its heart, it’s about decorating fabric with a needle and thread. While it sounds simple, there are many fun techniques to learn! You can try chain stitches for loops or French knots for texture. Embroidery lets you create unique designs in endless ways.
In the past, embroidery was both useful and pretty. During the 1830s, cheaper materials made it easier for people to enjoy. By the 1980s, machines helped beginners learn faster. Today, embroidery is more about creativity than showing off wealth. You can stitch names on gifts or make art for your walls. It’s a way to add your personal style to anything.
Here are some common techniques:
Technique | What It Does |
|---|---|
Cross-Stitch | Uses X-shaped stitches on a grid, great for starters. |
Backstitch | Makes solid lines, good for outlines. |
French Knot | Adds texture by looping thread around the needle. |
Chain Stitch | Creates bold, linked stitches for strong lines. |
Embroidery can be as easy or hard as you want. The best part? You only need fabric, thread, and a needle to begin!
Benefits of Embroidery for Beginners
Embroidery isn’t just fun; it’s also calming. Stitching over and over can feel relaxing, like meditation. Many people say it helps them feel less stressed and more focused. It’s a great way to slow down in a busy world.
This craft also improves hand skills and coordination. With practice, your stitches will look neater, and your designs will get better. Embroidery lets you follow patterns while still being creative and trying new ideas.
Learning embroidery is simple and affordable. Online videos and classes make it easy for anyone to start. Since it’s portable, you can work on your project anywhere—at home, outside, or while traveling.
Embroidery is also a way to show your personality. You can stitch quotes, colorful designs, or abstract art. It’s a chance to turn plain fabric into something special. Why not give it a shot? You might find your new favorite hobby!
Essential Tools and Materials for Beginners
Starting embroidery is fun, but the right tools help a lot. With just a few basics, you can begin your first project. Let’s look at what you need and some extras to make it better.
Must-Have Tools: Hoop, Needles, and Floss
You’ll need three main tools: an embroidery hoop, needles, and floss. These are the basics for every project.
Embroidery Hoop: This tool keeps fabric tight, making stitching easier. Hoops come in sizes, but beginners should try a 6-inch hoop. It’s light and easy to hold.
Needles: Embroidery needles have big eyes for thicker threads. Get a pack with different sizes to test what works best for you.
Floss: Embroidery floss is made of six strands. Use all six for bold stitches or split them for smaller details. Start with basic colors like black, white, and red, then add more later.
Pro Tip: Beginner kits often include these tools. They’re a simple way to start without stress.
Here’s how some tools improve your experience, based on reviews:
Feature | How It Helps Beginners |
|---|---|
Automatic Threading | Makes threading faster and easier |
USB Connectivity | Lets you access designs quickly |
Access to Designs | Adds more design options for creativity |
Many people like tools like the Brother SE600 for its touchscreen. It makes picking and editing designs simple for beginners.
Choosing the Right Fabric for Your First Project
Picking the right fabric is important for your first embroidery project. Some fabrics are easier to use than others. Here’s what to consider:
Thread Count: Lower thread counts are easier to stitch because needles move smoothly. Higher counts are finer but need more care.
Size: Make sure your fabric fits your design and hoop. A good beginner size is 12 x 18 inches.
Color: Neutral or white fabrics work with most designs. They also make stitches easier to see.
Durability: Buy fabrics from trusted brands to avoid fraying. Check labels for washing instructions if you plan to clean your finished piece.
Fabric Feature | What It Means |
|---|---|
Thread Count | Lower counts are easier for beginners; higher counts need precision. |
Size | Pick fabric that fits your hoop and design; 12 x 18 inches is common. |
Color | Neutral colors match most designs and show stitches clearly. |
Durability | Choose quality fabrics to avoid damage and follow care tips. |
Quick Tip: Cotton is great for beginners. It’s cheap, easy to use, and widely available.
Optional Accessories to Enhance Your Experience
While the basics are enough, extra tools can make embroidery more enjoyable. These are helpful upgrades for your kit.
Thread Organizer: Keeps floss neat and stops tangles.
Fabric Markers: Help you draw designs on fabric. Water-soluble markers wash off easily.
Needle Threader: Makes threading needles simple and quick.
Lighting and Magnifiers: Good lighting reduces eye strain, and magnifiers help with tiny details.
These extras aren’t required but can make your projects easier and more fun. As you practice, you might want to use them more often.
Remember, embroidery is about enjoying the process. Start small and add tools as you get better.
Preparing Your Fabric and Design
Before you begin stitching, get your fabric and design ready. This step helps your embroidery look tidy and professional. It also makes the process easier. Let’s go over the basics!
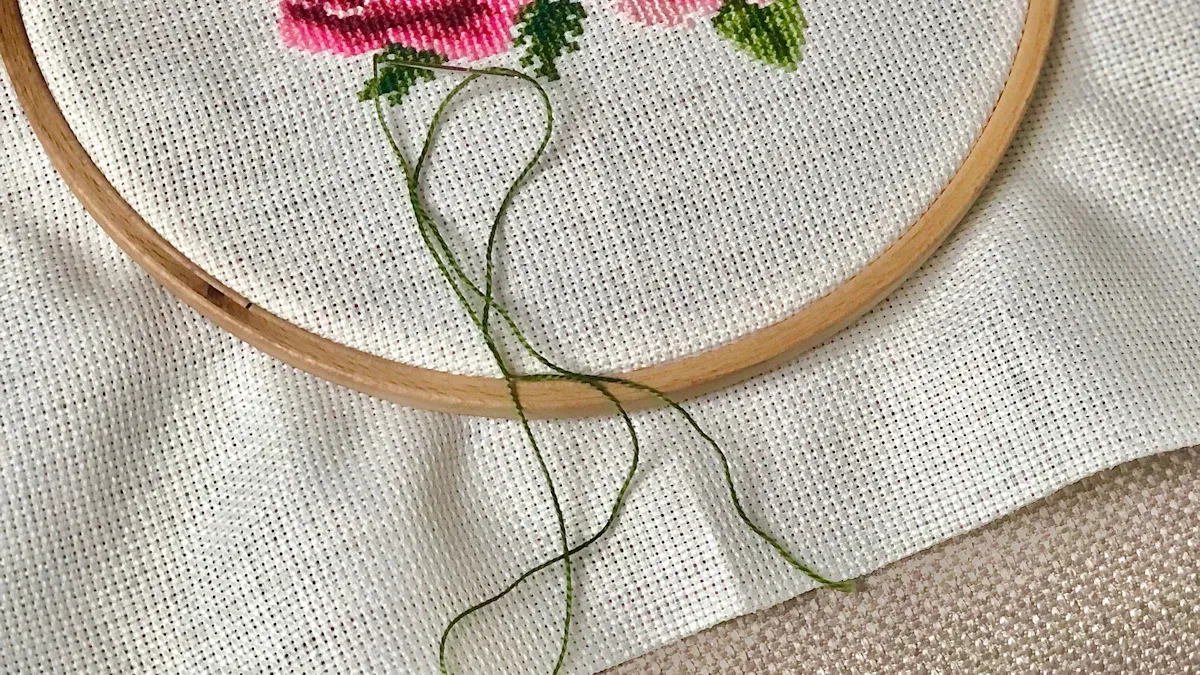
How to Prepare Your Fabric for Embroidery
Preparing your fabric is key to a great project. First, wash and iron your fabric to remove wrinkles or shrinkage. This is especially important for cotton or linen. Once smooth, cut the fabric to fit your hoop, leaving extra space around the edges.
To keep your fabric steady, use an embroidery stabilizer. This backing stops puckering and keeps stitches even. Pick a stabilizer that matches your fabric. Tear-away stabilizers are simple for beginners.
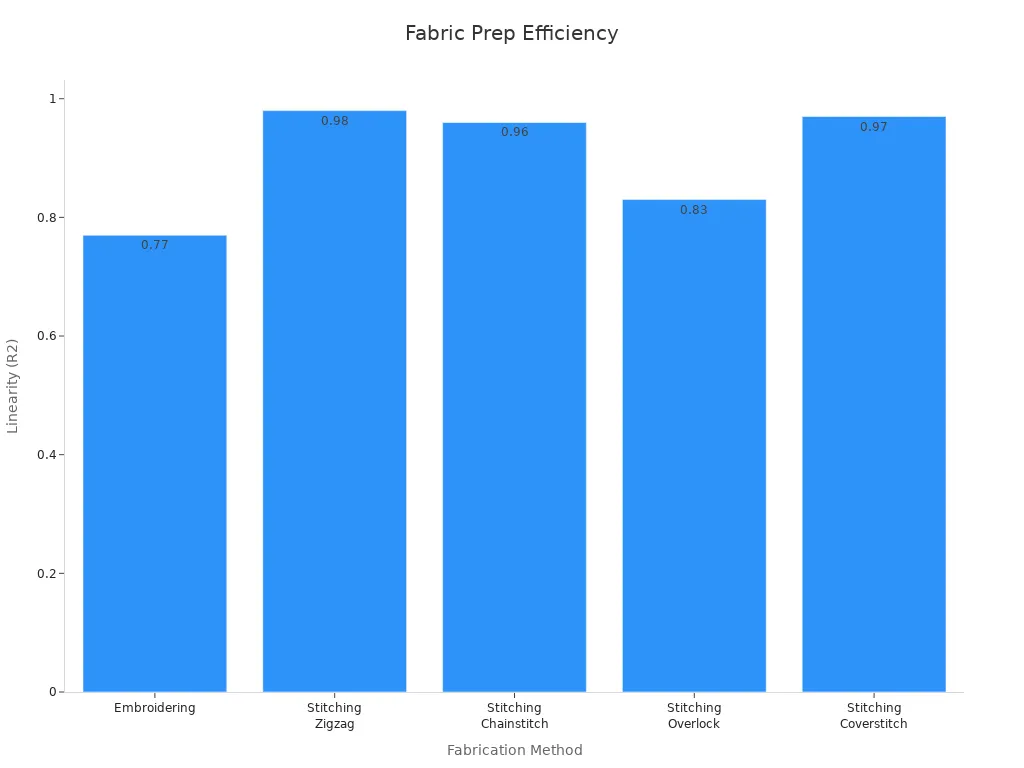
Here’s a quick comparison of fabric preparation methods:
Method of Fabrication | Stitch Type | Gauge Factor | Working Range (%) | Hysteresis (%) | |
|---|---|---|---|---|---|
Embroidering | N/A | 0.77 ± 0.07 | 1.88 ± 0.51 | 26 | 8.54 ± 2.66 |
Stitching | Zigzag | 0.98 | 1.61 | 50 | 6.25 |
Stitching | Chainstitch | 0.96 | 3.71 | 25 | 15.1 |
Stitching | Overlock | 0.83 | 0.1 | 16 | 0.98 |
Stitching | Coverstitch | 0.97 | 0.21 | 18 | 2.02 |
This table shows how preparation affects stitch quality. Beginners should focus on simple steps like ironing and stabilizing for the best results.
Easy Methods to Transfer a Design
Moving your design onto fabric is simple. There are different ways to do it. Choose the one that fits your tools and project.
Using Transfer Paper: Put transfer paper between your design and fabric. Trace the design with a pen, and the lines will show on the fabric. Use paper that matches your fabric color for better visibility.
Tracing Methods: Use a lightbox or sunny window. Tape your design to the glass and place your fabric on top. Trace the design with a water-soluble marker.
Digital Transfer Options: If you like tech, try printable fabric sheets or embroidery software. These are great for detailed or colorful designs.
Here’s a comparison of transfer methods:
Aspect | DST/DSB | |
|---|---|---|
Color Handling | Thumbnail previews | Manual mapping required |
Stitch Accuracy | Enhanced precision | Software-dependent |
Compatibility | Barudan TES/Wilcom | Cross-platform |
File Size | Larger (metadata-rich) | Smaller (basic data) |
For beginners, tracing with transfer paper or a lightbox is easy and effective. It’s also good practice before trying digital tools.
Setting Up Your Embroidery Hoop
An embroidery hoop keeps your fabric tight, making stitching easier. Setting it up right avoids problems later.
Initial Adjustment: Place your fabric over the inner hoop. Press the outer hoop on top. Pull the fabric from all sides to remove slack.
Testing the Tension: Tap the fabric lightly. If it sounds like a drum, the tension is correct. If not, adjust the screws until it feels right.
Regular Checks: Check the tension as you work. Fabric can loosen, so tighten it when needed.
Setting up your hoop properly improves stitching and avoids problems like hoop burn. Follow these steps to start stitching confidently!
Pro Tip: Test your setup on scrap fabric before starting your main project. This helps catch any problems early.
Mastering Basic Stitches and Techniques
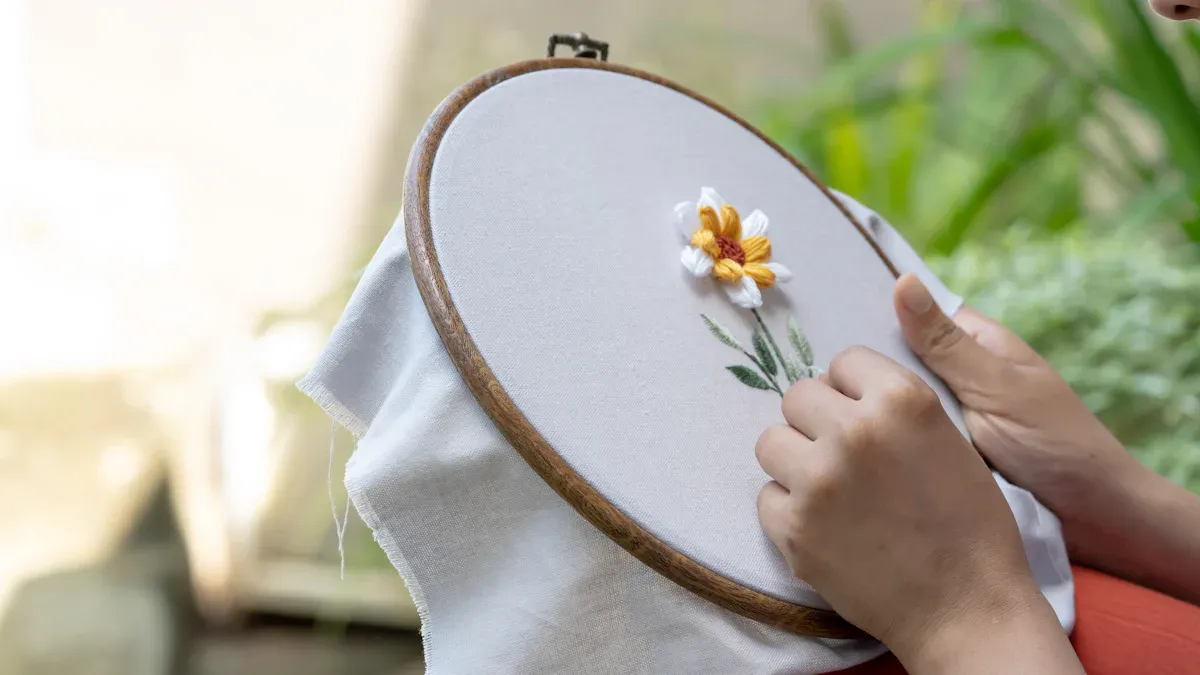
Embroidery is all about mastering the basics before diving into more complex designs. Once you get the hang of a few simple stitches, you’ll feel more confident and ready to tackle creative projects. Let’s break it down step by step.
Step-by-Step Guide to Basic Stitches
Learning basic stitches is like building a foundation for your embroidery skills. Start with these beginner-friendly stitches, and you’ll be amazed at how quickly you can create beautiful designs.
Backstitch:
This stitch is perfect for outlining shapes or creating clean, straight lines.Bring your needle up through the fabric at point A.
Push it back down at point B, then bring it up again at point C.
Insert the needle back into point B to create a continuous line.
French Knot:
Add texture and dimension to your designs with this fun stitch.Bring your needle up from the back of the fabric and hold the thread above where it came up.
Wrap the thread twice around the needle.
Insert the needle beside the starting point and pull it through while holding the thread tight. Voilà—a perfect knot!
Chain Stitch:
This one creates bold, linked loops that are great for borders.Bring your needle up at point A and form a small loop with the thread.
Insert the needle back into point A and bring it up at point B, catching the loop with the needle.
Repeat to create a chain of loops.
Long and Short Stitch:
This stitch is ideal for filling shapes and adding shading.Outline the shape with a backstitch.
Use long and short stitches to fill the shape, varying the length for a natural look.
Blend colors by layering stitches for a gradient effect.
Pro Tip: Practice each stitch on scrap fabric before starting your main project. It’s a great way to build muscle memory and avoid frustration.
Starting and Ending Stitches Neatly
Starting and finishing your stitches neatly is just as important as the stitching itself. It keeps your work tidy and ensures your embroidery lasts longer.
Starting Your Stitches:
Leave a small tail of thread at the back of your fabric.
Secure it by stitching over the tail with your first few stitches.
For extra security, tie a small knot at the end of your thread before you begin.
Ending Your Stitches:
Leave at least 6 inches of thread on your needle when you’re ready to finish.
Slide the needle under the nearest stitch to create a loop.
Pull the needle through the loop to form a knot, then repeat for a double knot.
Trim the excess thread close to the knot for a clean finish.
Quick Tip: If you’re using a sewing machine for parts of your project, make 3 to 5 backstitches at the start and end of your stitching to lock everything in place. Adjust the stitch length for added security.
Avoiding Common Beginner Mistakes
Embroidery is a forgiving craft, but a few common mistakes can make your project more challenging. Here’s how to avoid them:
Skipping Fabric Preparation: Always pre-wash and iron your fabric. Skipping this step can lead to puckering after washing, which happens in 15–20% of cases.
Over-Tightening the Hoop: While it’s important to keep your fabric taut, pulling it too tight can cause a 25% increase in stitch failure. Adjust the tension until the fabric feels firm but not stretched.
Using Dull Needles: A dull needle can shred your thread, increasing the chance of breakage by 10%. Replace your needle regularly to keep your stitches smooth.
Poor Fabric Alignment: Misaligned fabric can skew your design by up to 30%. Take a moment to double-check that your fabric is centered in the hoop before you start stitching.
Note: Mistakes are part of the learning process. Don’t stress if your stitches aren’t perfect at first. With practice, you’ll improve and enjoy the process even more.
By mastering these basic stitches and techniques, you’ll set yourself up for success in embroidery. Take your time, enjoy the journey, and remember—every stitch brings you closer to creating something amazing!
Finishing and Caring for Your Embroidery
Washing and Ironing Your Embroidery
Taking care of your embroidery helps it last a long time. Washing and ironing are important but need to be done gently.
Washing: Turn your embroidery inside out before washing. Use cold or warm water with mild soap to protect the threads. Avoid bleach or strong cleaners, as they can harm the colors. Handwashing is best, but if using a machine, choose a gentle cycle.
Ironing: To remove wrinkles, set your iron between 250–300°F (121–149°C). Place your embroidery face down on a soft towel to protect the stitches. Press the iron down firmly for 10–15 seconds without steam. Steam can weaken stabilizers and cause puckering.
Quick Tip: Test your washing and ironing methods on a hidden fabric area first. This avoids unexpected damage!
Displaying or Framing Your Finished Piece
Show off your embroidery proudly! Whether gifting it or hanging it, framing adds a polished touch.
Iron your embroidery to remove wrinkles. A smooth surface looks professional.
Pick a frame that matches your design. Wood or metal frames work well.
Center your embroidery on the backing board. Sew a zig-zag stitch around the edges to keep it tight.
For a modern look, stretch your embroidery over a canvas frame. It’s sleek and stylish.
Hang your framed piece on a wall or place it on a shelf for a cozy vibe.
Pro Tip: If using glass in your frame, leave space between the fabric and glass. This prevents moisture buildup.
Storing Your Embroidery Supplies Properly
Organizing your supplies saves time and keeps them safe. Whether you have a few tools or many, there’s a storage option for you.
Storage Type | Benefits | Drawbacks | Best For |
|---|---|---|---|
Saves space, easy to see | Exposed to dust/light | Small spaces, daily use | |
Pegboards | Customizable, holds tools | Needs setup | Flexible, multi-tool setups |
Drawer Systems | Protects from dust/light | Harder to see, pricier | Large collections, long-term |
Plastic Bins/Boxes | Stackable, portable, cheap | Hard to see inside | Bulk storage, easy to move |
For tools you use often, wall racks or pegboards are handy. For long-term storage, drawers or bins protect items from dust and light. You can also use jars or decorative boxes for a personal touch.
Note: Combine storage types for the best setup. Use racks for daily tools and bins for less-used items. This keeps your space neat and practical.
By caring for your embroidery and supplies, you’ll enjoy crafting even more. Plus, your finished pieces will stay beautiful for years!
Embroidery isn’t just a hobby—it’s a way to grow creatively. Begin with easy patterns, and each stitch will boost your skills. Over time, you’ll learn new methods and find unique ways to express yourself.
“Learning never stops when you believe in improving through effort. Psychologist Carol Dweck’s idea of a growth mindset shows that hard work helps develop talents and intelligence.”
To keep improving, check out online videos and join embroidery groups. These communities provide:
Helpful advice to make your stitching better.
Ideas for fun and creative projects.
A chance to meet others who love embroidery too.
Pick up your needle, enjoy the journey, and let your creativity shine! ✨
FAQ
What’s the best way to start embroidery as a beginner?
Start with a simple kit! These kits include everything you need—fabric, thread, needles, and a pattern. They’re perfect for learning the basics without feeling overwhelmed.
How do I fix mistakes in my embroidery?
Don’t worry—it happens! Use a seam ripper or small scissors to carefully remove the stitches. Then, re-thread your needle and try again. Mistakes are part of learning!
Can I use regular sewing thread for embroidery?
You can, but embroidery floss works better. It’s thicker and comes in six strands, giving your designs more texture and color options. Plus, it’s easier to work with!
Pro Tip: Always test your thread on scrap fabric first to see how it looks and feels.